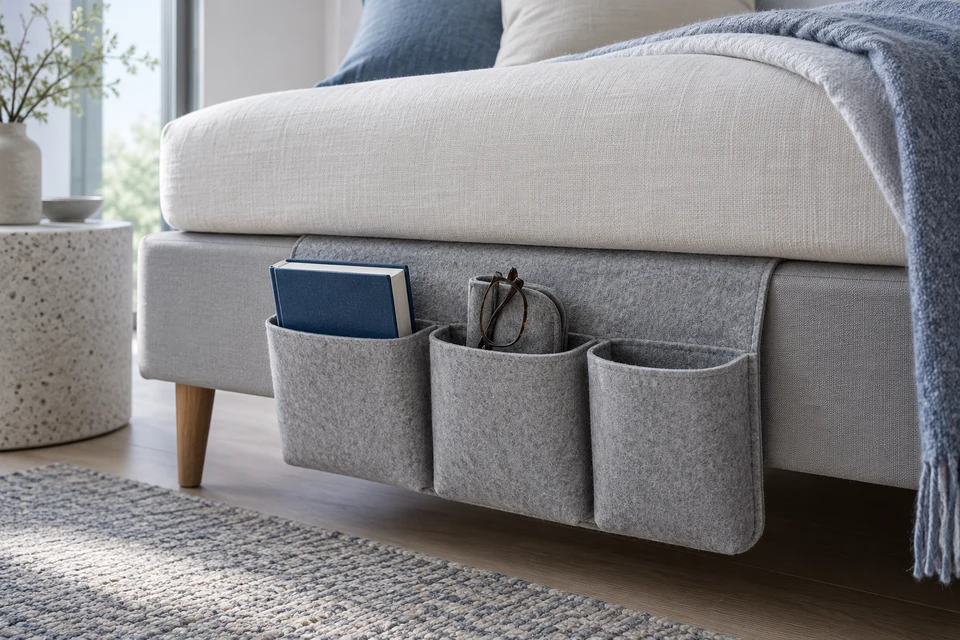
A mattress-tucked bedside organizer relies on its relationship with the bed as much as on the shape of its pockets. A photograph can hide a short flap, a low-hanging pocket or a bed base that interrupts the intended installation. Buyers should approve the full arrangement on representative beds and describe the product's limitations accurately, rather than treating it as a universal hanging storage solution.
Map the bed before selecting the organizer
Identify the supported installation route
Record the mattress thickness, edge profile, bed-base construction and the gap where the flap is intended to sit. Decide which bed types the retail description will name. A simple mattress-on-base trial does not establish compatibility with every upholstered frame, adjustable bed or recessed platform. Where moving bed mechanisms are involved, follow the bed manufacturer's instructions and obtain appropriate review rather than extending a static sample approval.
Photograph the installed organizer from the side with the bedding arranged as intended. Include the bed rail, floor and any nearby furniture. Keep the measured references in the size-set approval record. The purpose is to show the actual installation conditions, not to make the product appear smaller or more concealed than it will be in use.
- Identify the bed constructions included in the brief.
- Do not generalize a static trial to moving-bed compatibility.
Specify the tucked flap and its junction
Measure what remains beneath the mattress
Separate total flap length from the portion available for insertion after the organizer reaches its intended hanging height. Specify width, thickness, edge finish and the joint between flap and pocket panel. Check that the junction follows the bed edge without forcing the pockets into a tilted position. A wide felt panel may look tidy while an unexpectedly thick seam makes the installation awkward.
Ask for a finished sample with all layers present. If a backing, stiffener or surface treatment is proposed, identify it in the component specification and review it on the actual bed materials. Do not assume that adding a grippy-looking layer establishes retention or compatibility with every upholstery finish. Retain the approved construction rather than an unlabelled prototype.
- Record the inserted length and hanging height separately.
- Inspect the flap-to-panel seam on both faces.
Build the pockets around intended objects
Keep the loaded shape clear of the floor
List the objects used in the development trial, such as a book or glasses case, and state whether they are excluded from the sale. Measure usable pocket openings and depth after assembly. A large flat pattern piece can become a much narrower usable pocket once its sides are sewn. Check the most bulky intended object and the complete proposed arrangement, not only one small item.
Observe the panel while loaded with the agreed contents. Record tilt, distortion and floor clearance, and assess the retention question through the responsible product review. Do not convert an informal book demonstration into a universal load claim. Use the seam checklist to document pocket divisions, lower corners and reinforcement, especially where several pockets share the same panel.
- Record actual contents used for the sample review.
- Check pocket bottoms against the bed rail and floor.
Approve felt, edge finish and cleaning instructions
Retain the intended handle
Specify composition, thickness, colour and whether the felt is single-layer or laminated. Appearance does not establish recycled content, wool content or certification. Compare cut edges, sewn edges and the pocket mouth for visible fibres and uneven finishing. Review whether the proposed construction keeps the pocket shape appropriate for the intended contents without implying rigidity or protective performance it has not demonstrated.
Evaluate a finished sample under the proposed cleaning instructions and refit it on the same bed. Check flap shape, seam alignment and pocket openings afterward. Use the care-label review to ensure that packaging does not promise an easier cleaning route than the approved construction supports. Any different material or backing requires another review of the installation and care combination.
- Retain a material swatch and a complete organizer.
- Recheck the loaded shape after the agreed care trial.
Package an accurately described storage accessory
Keep variants and instructions distinct
Specify how the organizer is folded for shipping and how the customer should unfold and install it. Open a packed sample after the agreed storage period and inspect whether creases distort the pockets or flap. Include a clear installation illustration based on the approved bed configuration, without hiding the part that must remain under the mattress. Keep unsupported child-safety, universal-fit and load claims out of the copy.
The retail packing checklist helps record the folded unit and carton arrangement. Quote pocket layouts, material thicknesses and colours as explicit variants, with minimums and sample milestones confirmed separately. Share the intended beds, object list, pocket layout and packaging format with FY Bedding to establish a development scope before committing to production quantities or delivery dates.
- Show the insertion route and the intended pocket orientation.
- State that photographed books and accessories are not included when applicable.
Approve the organizer on the specified bed with the intended pocket contents. The inserted flap, loaded panel and floor clearance must all refer to the same finished sample.