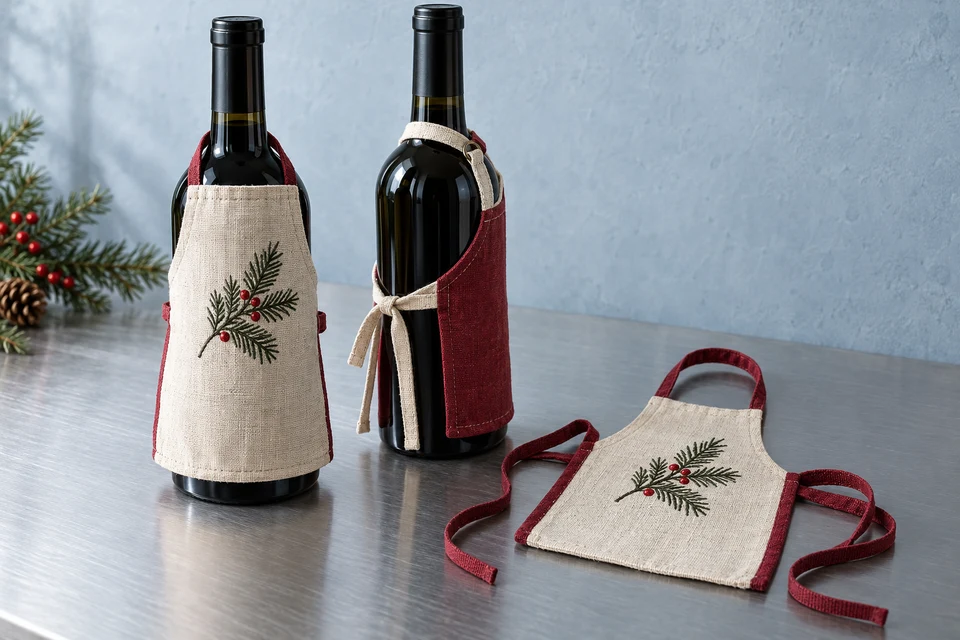
A miniature bottle apron decorates the front of a bottle without enclosing its base. That makes it different from a gift bag or full sleeve: the neck loop controls the height of the bib, while waist ties control how it rests against the body. A buyer should approve those two relationships on the intended bottle shapes before choosing a universal size or copying the arrangement from a styled Christmas photograph.
Identify the bottle profiles in the assortment
Volume is not a fitting measurement
Collect the neck circumference, shoulder position, body width and the distance from the top of the neck to the desired lower bib edge. Photograph the bottle profile without relying on its nominal volume. Tall narrow bottles and short broad bottles may require different loop lengths even when their contents are described by the same volume. Keep display bottles separate from any products included in the commercial supply.
The development specification should show the intended apron position on each approved profile. Decide whether the project needs separate sizes, an adjustable design or a deliberately limited compatibility range. Do not call the apron universal simply because a tie can be tightened around several different objects.
- Record the neck, shoulder and body geometry.
- Approve every materially different bottle profile offered.
Set the bib height through the neck loop
The front motif should not disappear under the shoulder
Fit the loop without tying the waist first and observe where the bib naturally hangs. Check whether the upper edge rests above or below the intended shoulder line. An oversized loop may drop the motif too low; a short loop may pull the bib upward and make the bottom edge lift. Review the final loop construction, including any adjustment hardware or sewn joins proposed by the supplier.
Use the textile-loop finish review to inspect exposed edges and joins. Keep the motif centered in the visible fitted panel rather than only on the flat pattern. The neck loop is a decorative attachment, not a carrying handle, unless a separate agreed design and evidence support a different use.
- Photograph the bib before and after waist adjustment.
- Define the loop function and do not imply a carrying use.
Choose the waist-tie route deliberately
A neat front should not create a confused reverse
Specify where the ties emerge from the bib and show their route around the bottle. Review the bow or knot at the back, including the remaining loose length. Ask a person unfamiliar with the sample to fit it using the proposed instructions. If the apron twists, identify whether the tie position, bib width or bottle taper is responsible rather than tightening it until the photograph looks acceptable.
The attachment-seam checklist helps describe the connection between narrow ties and the main panel. Check the reverse finish and any contact with the bottle surface. A fabric apron is not evidence of impact protection, leak containment or a secure transport pack; those are different requirements and should not be implied by decorative coverage.
- Approve the reverse knot and remaining tie length.
- Repeat fitting without undocumented clips or adhesive.
Keep the label and the textile message separate
Decoration should not obscure required product information
Discuss what information on the underlying retail product must remain visible in the intended sales arrangement. The textile buyer and the product owner should agree placement rather than allowing the apron to cover labels by accident. This guide does not determine labeling obligations for any beverage or market. It identifies the practical need to review the complete display before approving the decorative component.
Use artwork version control for the apron motif itself. Keep original Christmas embroidery or print references separate from any brand artwork supplied by a customer. Obtain the necessary permission for requested graphics and do not infer authorization from a photograph found online. Confirm whether decoration is on one face or both.
- Review the apron together with the actual retail label layout.
- Separate supplied artwork rights from textile construction approval.
Define the textile-only unit of sale
A styled bottle is not an included component
State whether the offer contains one apron, a pair or an assortment, and identify the loop, ties and any adjustment pieces included. If bottles are only fitting props, say so in the quotation and retail copy. Check the flat pack and the first fitted appearance after unpacking. Creases across a small embroidered bib can change how the motif looks even when the stitching is correct.
The pack-out completeness process can verify counts and color mixes. Ask about minimums for the selected cloth and embroidery setup, then confirm the sample and dispatch milestones. Do not promise holiday availability or compatibility beyond the agreed fitting record. Retain one flat sample and one fitted reference for inspection.
- Specify apron count and explicitly exclude display props where appropriate.
- Confirm the size mix and motif mix on purchase lines.
Send FY Bedding the intended bottle profiles, desired bib position and textile-only set count. Request a fitted sample showing the neck loop, waist ties and underlying label visibility before confirming the seasonal assortment.