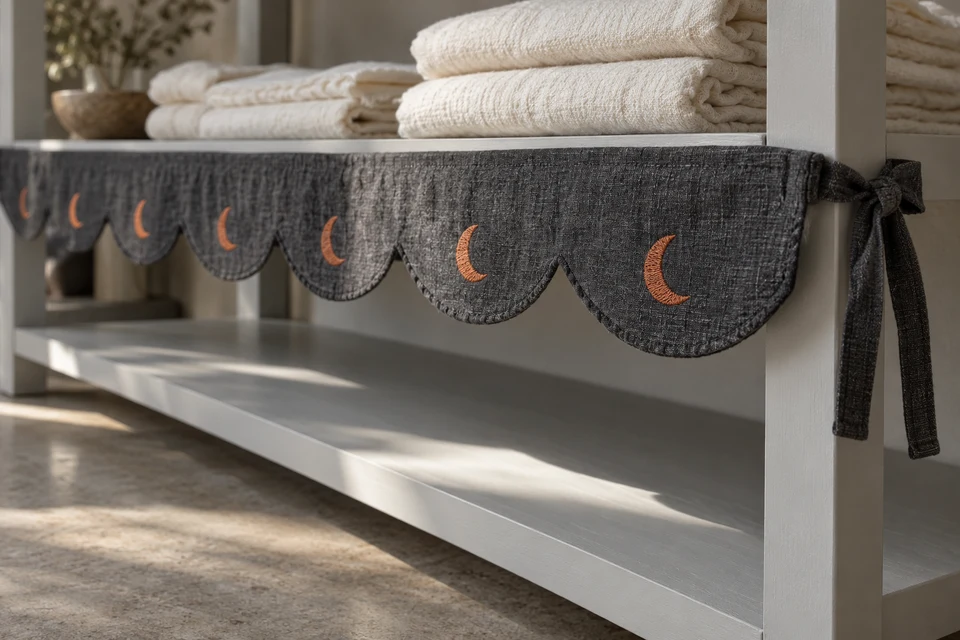
A short scalloped textile can introduce Halloween color without replacing the products on a retail shelf. The buying problem is different from a free-hanging banner: the trim must follow a specific fixture, finish sensibly at its ends and leave merchandise accessible. A front-view concept is not enough. Approve the shelf corner, support points and clearance below the scallops before ordering a repeated length for multiple stores.
Survey the fixture rather than the room
Usable attachment length comes first
Record the shelf frontage, end-post positions, thickness and the locations where a removable tie or other approved fixing can actually be used. Measure the clear space below the shelf and note any price rail, drawer or door that must remain accessible. Do not divide the overall wall length by a nominal trim size; fixture interruptions can make that calculation misleading.
The product brief should include photographs from the front and from each end. Group genuinely identical fixtures, but keep exceptions visible. A trial on one freestanding display does not approve a different wall-mounted shelving system. If an attachment method needs approval from the fixture owner, obtain it before the textile is released.
- Measure usable frontage between actual attachment points.
- List obstructions and exceptions for each fixture type.
Resolve the scallop repeat at both ends
Avoid an accidental half-motif at the corner
Choose the number of complete scallops across the frontage and decide how the design terminates. A continuous repeat may leave a narrow fragment at one end when cut to a store-specific length. Options such as a plain end section or a deliberately adjusted repeat should be reviewed as design decisions, not improvised by the installer. Keep the lowest edge consistent with the agreed clearance.
Refer to scallop and corner approval for useful edge-construction questions, while using the shelf dimensions for this product. Inspect the seam or binding around the valley between two curves. For embroidered moons or similar motifs, mark the intended center within each finished scallop rather than centering only on the cut pattern.
- Approve both terminal sections, not just the central repeat.
- Review the deepest point of the scallop on the fixture.
Make attachment and tension reproducible
Installation should not reshape the artwork
Have the sample installed using the proposed supplied ties, tabs or other defined fixing. Observe whether tension straightens the top edge while pulling the scallops out of shape. Record the installation sequence and any adjustment range. A stretched textile that looks neat in a photograph may not return to the same position after staff remove it for cleaning or merchandise changes.
The webbing-end review is relevant when fabric ties are used. Ask how their ends and attachment seams are finished, and check where loose lengths rest. Do not substitute adhesives or metal fastenings without reviewing the fixture and textile again. This guide does not establish a load rating or authorize attaching anything to an unsuitable support.
- Use the actual supplied fixing during sample approval.
- Record a clear installation reference for store staff.
Try the merchandise access route
Decoration should not hide the product
Place the intended merchandise on the shelf and have the store team retrieve and replace it. Review whether the trim covers labels, catches on packaging or drapes across the shelf below. Check the corner from the aisle, because a tie that is discreet from the front may be prominent from the side. Review normal viewing distances before choosing embroidery detail that only reads in a close photograph.
Use display-sample controls to keep this installation trial separate from saleable stock. Agree how the textile is removed and stored between campaigns. The approval record should state the actual merchandise arrangement tested; changing the shelf height or box depth can require another trial even when the decorative trim itself is unchanged.
- Check label visibility and product removal with the trim fitted.
- Photograph the aisle view and the side view.
Order by fixture kit, not decorative meter alone
Keep custom lengths identifiable
Build purchase lines for each approved fixture group, including finished length, scallop count, attachment pieces and packaging identification. Ask whether minimums apply by fabric color, embroidery setup or finished length. A supplier may offer a standard repeat to reduce complexity, but the buyer should confirm how that repeat ends on every relevant shelf before accepting the alternative.
The unit-notation checklist helps prevent confusion between a continuous meter quantity and a number of completed trims. Pack each store kit with its matching installation reference. Confirm sampling and delivery milestones after the fixture survey; do not infer a holiday rollout date from an unapproved visual mock-up.
- State completed pieces and their exact fixture assignments.
- Confirm which installation components are included in each pack.
Send FY Bedding a measured shelf drawing, front and side photographs, and the merchandise clearance required. Request one fully fitted trim before deciding the length assortment and bulk quantities.