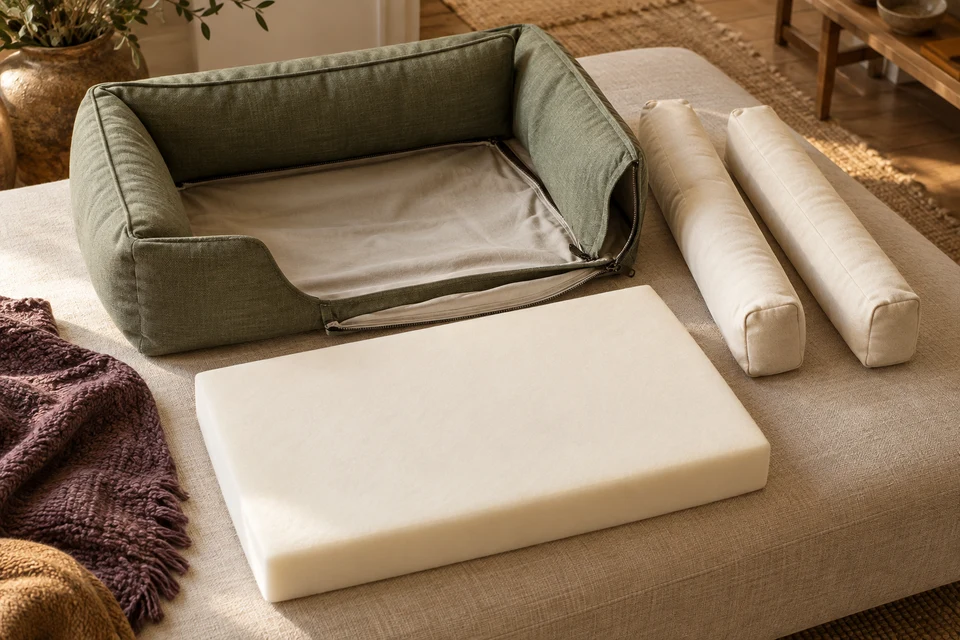
A replacement cover for a bolstered pet bed must accept the existing base and side inserts, not merely resemble the original bed. A generous outside measurement can conceal an opening too short for removal. Buyers should map each insert to its compartment and access route, then approve the complete reassembly sequence before selling the cover as compatible.
Inventory the inserts before measuring the shell
Separate the base from the bolsters
Identify the target bed model and obtain the actual insert set. List the base, side bolsters, rear bolster and any separate inner liners. Record whether inserts are individual pieces or joined into a single assembly. Include their relaxed dimensions, orientation and distinguishing features in the brief. Do not infer the internal arrangement from a product photograph showing only the assembled exterior, and do not assume all beds marketed under one size name use the same construction.
The component record should distinguish the replacement shell from inserts that the customer already owns. If the proposed offer includes new inserts, treat that as a different supplied unit with its own review. Identify which legacy bed versions are actually supported and which remain unverified. A compatible colour and matching outside footprint do not prove that an older bolster arrangement will fit.
- List every insert and its orientation.
- Define cover-only versus insert-included scope explicitly.
Map each compartment to an access route
A long zipper can still leave a difficult corner
Draw the openings and show the order in which inserts are removed and replaced. Record usable opening length rather than zipper tape length alone. Check end stops, curved corners and seam allowances that reduce access. A base may need a broad opening while a long side insert needs a different route. Do not require users to fold or compress an insert in a way that conflicts with its care or handling instructions merely to make a prototype pass.
Refer to the zipper component review for construction questions, then test the actual loaded shell. Inspect whether the slider catches lining or reaches an awkward position beneath a bolster. Keep the intended closed state clear and ask the responsible product reviewer to assess accessible hardware in the proposed pet-use setting. This fit review does not establish chew resistance, pet safety or a certified fastening capacity.
- Measure the usable opening at its narrowest point.
- Demonstrate access without forcing the reference insert.
Approve the bed after every insert is installed
Check the entry edge and internal partitions
Place the filled sample on the intended flat surface and inspect the base, corners and entry edge. Look for a twisted side channel, a floating base corner or a bolster pulling the low entry upward. These may indicate a compartment or orientation mismatch even when the outer dimensions appear correct. Compare the fully assembled bed with photographs of the documented reference configuration, not with a styled image from a different model.
Use the size-set sample process for each supported bed size. Mark insert orientation in the internal instructions where it cannot be understood easily from the shape. Any proposed labels or markers must also be reviewed for placement and use. Do not approve a large cover by enlarging every panel proportionally if the base thickness, bolster diameter or entry proportion changes between sizes.
- Check all compartments with the complete insert set installed.
- Keep the low entry profile in the size-specific approval.
Separate shell cleaning from insert cleaning
Reassembly is part of the care review
Confirm the outer textile, lining, base material, thread and closure components. Define which parts are removed for cleaning and obtain instructions for each supplied component. A washable shell does not establish that the foam or bolster filling can follow the same process. Demonstrate removal, the approved care procedure and reassembly using the identified sample set. Record any preparation required before the cover returns to its intended fitted shape.
The care-label checklist helps reconcile those steps with packaging and online instructions. Recheck access and complete-bed shape after care, including the underside rather than only the visible cushion face. Do not add waterproof, odour-proof, antimicrobial, indestructible or claw-proof language without suitable product-specific evidence. If a special backing is proposed, its performance and care compatibility require a separate reviewed basis.
- Distinguish shell and insert care routes.
- Repeat removal and reassembly after the agreed care trial.
Keep compatibility visible on the retail pack
Replacement customers need the right revision
Build a compatibility table showing the bed reference, insert arrangement, cover size and revision. Explain any exclusions in the customer-facing description instead of relying on a universal replacement claim. A pack photograph may show a complete bed for context, but cover-only wording and supplied contents must be obvious. Include reassembly guidance that matches the actual number of compartments, not a generic instruction sheet borrowed from a simpler cushion cover.
Use the reorder control guide to retain the approved insert map and pattern revision. Ask quotations to distinguish fabric, size and closure minimums and confirm that a repeat order preserves the reviewed access route. Send FY Bedding the target insert set, compatibility list, care requirements and quantity split for assessment. Availability, construction feasibility and delivery need project-specific confirmation before making a retail replenishment promise.
- Publish only compatibility that has been reviewed.
- Keep the insert map with each pattern and stock revision.
Approve the replacement as a system of inserts, compartments and usable openings. Correct outside size does not replace a complete removal, care and reassembly review.