A duvet cover can match the approved fabric and dimensions yet still frustrate hotel or retail users when its closure line twists, gaps, scratches the insert or releases buttons in laundering. Closure defects often come from interactions among placket depth, button spacing, buttonhole direction, reinforcement and shrinkage, so checking only button count does not establish functional conformity. The buyer needs a released closure drawing, a production-representative trial and lot-linked inspection evidence that separates visual alignment, attachment integrity and end-use operation. This guide is a procurement-control framework, not a substitute for the buyer's specification, a test standard or a contract. It intentionally avoids invented factory capabilities, certificates, universal tolerances and automatic legal conclusions. The useful outcome is a repeatable approval and evidence route that lets design, production, quality, logistics and receiving teams compare the same item under stated conditions.
1. Freeze the closure map
Geometry must be approved before sewing
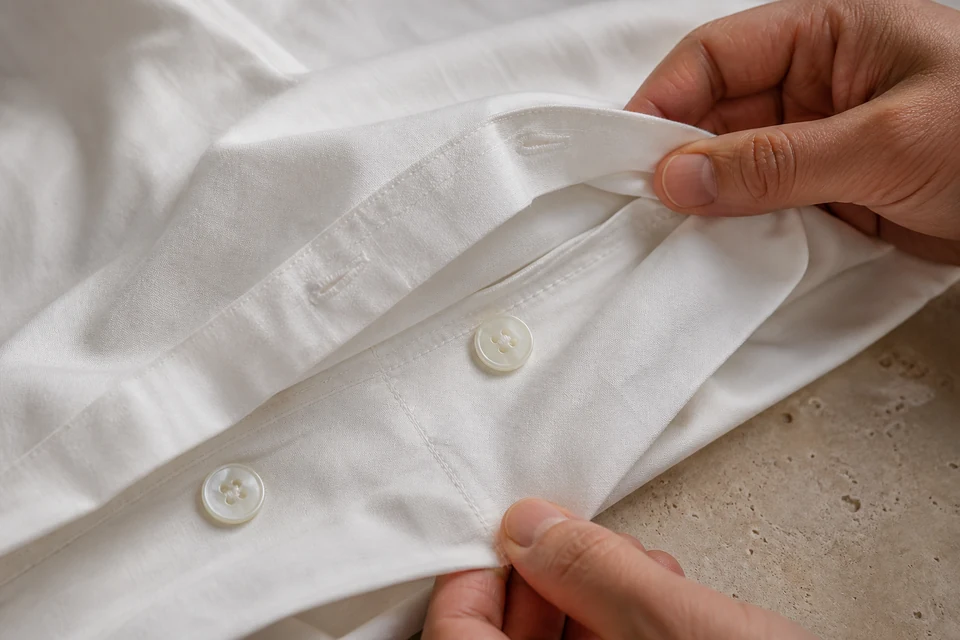
Define finished placket depth, overlap, opening width, button count, centerline, end offsets and spacing by product size. Begin with the released buying specification and the actual sample identity; do not let a convenient workshop convention become an unstated requirement. An operator can distribute buttons evenly across the wrong opening or hide a dimensional mismatch inside a folded edge. Buyers can place this control beside the FY Bedding quality route so material, construction and inspection decisions refer to the same revision. Record who checked the point, when it was checked and what product or lot was represented.
An annotated measurement sheet, approved sample photographs and revision identifier provide the comparison basis. The record should distinguish an observation from an acceptance decision and identify any approved deviation. Compare results with the AQL sampling guide, then state the hold, correction, recheck or release route. This prevents photographs and measurements from becoming detached files that cannot explain a production or sourcing decision later. Keep commercial disposition with authorized buyer and supplier representatives rather than embedding an automatic claim in the inspection method.
- Dimension the finished opening and overlap.
- State button count and end offsets by size.
- Identify the approved closure revision.
- Keep the map with the sewing operation.
2. Control buttonhole construction
Cutting, stitch coverage and direction work together
Treat this point as a controlled handoff, not a final visual glance. Specify buttonhole orientation, finished length relative to the approved button, stitch coverage, bar-tack condition and cut cleanliness. The practical risk is specific: A hole that is too long can open in use, while incomplete cutting, loose threads or weak ends can snag during room turnover. Use the sample request route to connect development and bulk controls, and capture the product size, color, lot, production stage and applicable revision. When the condition varies by size or configuration, show the range explicitly instead of approving one convenient specimen for every variant.
Evidence must be sufficient for another reviewer to reproduce the conclusion. First-piece records and close-up photographs should show the front and reverse condition without relying on a vague good-workmanship label. Link the result to the lot-traceability guide and preserve original measurements as well as any summary. A failed or uncertain result should remain on hold until an authorized disposition identifies affected quantity and the required reinspection. This disciplined route is more useful than adding an unsupported numerical limit after production has already begun.
- Compare hole length with the approved button.
- Inspect both buttonhole faces.
- Check clean cutting and secured ends.
- Hold first pieces before bulk continuation.
3. Verify button attachment and protection
Attachment must suit repeated handling
A buyer-ready specification names the reference, method and decision owner. Confirm button type, face orientation, thread, stitch pattern, shank condition and reinforcement against the released construction. Without that discipline, Visible pull damage, fabric puckering or a hard protrusion can appear even when the button remains attached. The buying brief can provide the surrounding approval gate, while the article-specific record captures the feature itself. Include production-representative conditions and note any substitute equipment, material or mock-up component that could affect interpretation.
Close the check with traceable evidence rather than a pass stamp. Use a buyer-approved attachment check and record the method, sample identity and result rather than inventing a universal force limit. Review it together with the packaging and carton approval guide, record deviations by location and quantity, and show what was reinspected after correction. If buyer and supplier have not agreed a numerical tolerance or test route, report measured findings and request disposition; do not invent a threshold that could be mistaken for a standard or contractual promise.
- Match button material and finish to the master.
- Review shank and reinforcement condition.
- Check surrounding fabric for distortion.
- Record the agreed attachment method.
4. Trial closure before and after laundering
Function is evaluated in realistic sequence
Build the control around the real end-use sequence. Insert the intended duvet or a controlled equivalent, close every button, handle the cover, launder under the approved care route and repeat the fit check. This matters because Shrinkage can change spacing and overlap, and a closure that works flat on a table may gap or invert around a filled insert. Refer to the golden-sample approval workflow for the wider sourcing workflow, then identify sample, method, conditions and reviewer in the feature record. Separate development exploration from the final released rule so production teams know which observations are informative and which are mandatory.
The evidence pack should make the outcome understandable without relying on memory. A before-and-after trial record should include product size, insert reference, care cycle and any button, hole or placket change. Cross-reference the incoming-fabric inspection guide, retain before-and-after views when a trial changes the product, and document the affected lot when a finding appears in bulk. Correction is not closure until the changed quantity is verified again under the same rule and the authorized disposition is recorded.
- Close the cover around the intended insert.
- Use the approved care route.
- Repeat alignment and opening checks.
- Retain comparative photographs.
5. Inspect bulk and pack-out
Sampling must protect all sizes and lots
Distribute samples across sewing lines, sizes, colors and production periods, then inspect geometry, operation and presentation before folding. Begin with the released buying specification and the actual sample identity; do not let a convenient workshop convention become an unstated requirement. A concealed placket can be creased into the retail pack in a way that stresses buttons or makes the first opening appear defective. Buyers can place this control beside the pre-production sample guide so material, construction and inspection decisions refer to the same revision. Record who checked the point, when it was checked and what product or lot was represented.
Lot-linked reports, defect photographs, repair disposition and retained samples close the evidence chain for reorder comparison. The record should distinguish an observation from an acceptance decision and identify any approved deviation. Compare results with the final-inspection checklist, then state the hold, correction, recheck or release route. This prevents photographs and measurements from becoming detached files that cannot explain a production or sourcing decision later. Keep commercial disposition with authorized buyer and supplier representatives rather than embedding an automatic claim in the inspection method.
- Stratify inspection by size and lot.
- Operate every sampled closure.
- Check fold pressure at pack-out.
- Link repairs to reinspected quantities.
Release the closure only when placket geometry, buttonholes, attachment, laundering performance and bulk pack-out all trace to the same approved construction.