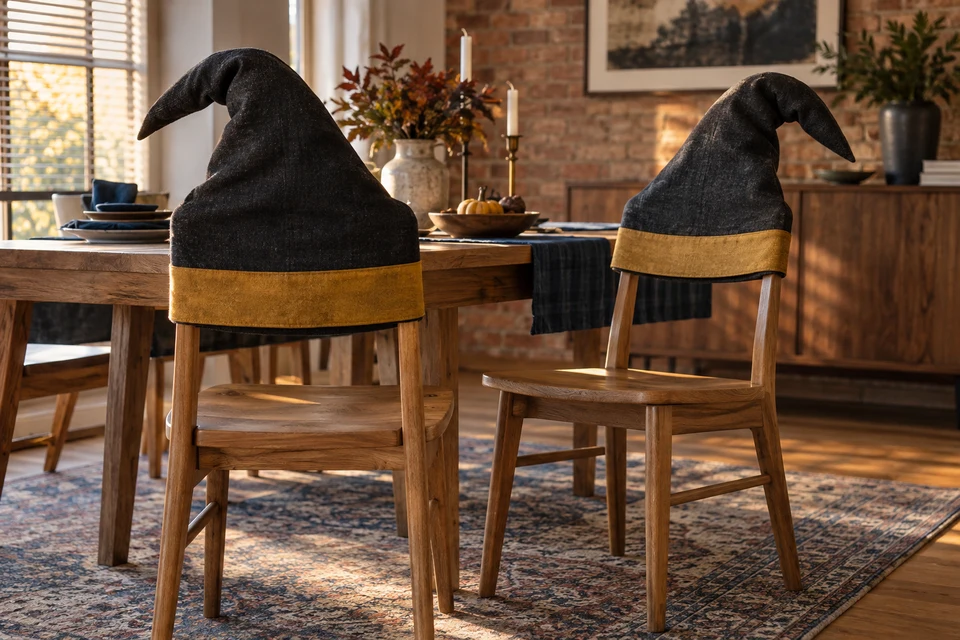
A witch-hat chair-back cap is a decorative sleeve for the upper backrest, not a full chair cover. The buyer needs to control how it fits the chair, how the tapered point falls and whether the seat remains usable. An appealing isolated cap does not answer those questions.
Measure the backrest that will wear it
Overall chair width is not enough
Identify the exact chair model or the defined chair group. Record the backrest width at the top and at the lower edge of the intended cap, its thickness and the profile of its top corners. Curved timber, upholstered backs and open slats present different shapes even when their maximum widths are similar. Photographs from front, side and rear help explain what a dimension list misses.
Use chair-cover fit trials for the broader measurement discipline, but keep this cap's scope narrow. It should not silently expand into a seat cover or promise universal fit. If several chair types are proposed, make a fit matrix showing which have been sampled and which remain unconfirmed. A cap that looks acceptable on one showroom chair is not evidence for every chair in a venue.
- Name the chair model and the intended lower edge of the cap.
- Record top curvature and thickness as well as width.
Approve the point as a textile form
Choose a soft bend or a supported profile
Draw the intended witch-hat silhouette from the front and side. State whether the point should fall to one side, stand loosely or hold a more structured shape. Ask for a production-representative sample rather than adding hidden stuffing or pins during photography. Any shaping component needs to be included in the product specification and reviewed for the intended setting.
Position the sample on the chair and observe how the point behaves after ordinary handling. Check the profile from both sides of a dining table; a point that looks playful from the front may obscure the cap's band from behind. Keep the decision distinct from chair-sash knot presentation. A tapered slip-on sleeve has no adjustable knot to compensate for a poor fit, so the shape must work with its own construction.
- Record the accepted bend direction and approximate profile.
- Disclose every supplied shaping component in the brief.
Place the band on the fitted cap
A level band on the table may tilt on the chair
Mark the contrast band's position relative to the finished opening and the chair's top. Fit the cap without stretching it beyond the intended handling method. Inspect whether the band stays reasonably aligned, whether side seams rotate and whether the opening looks strained at the backrest corners. Agree the acceptable appearance using the actual sample, not a numerical tolerance chosen without a trial.
Check the rear and inside as well as the main display face. If the fabric has a distinct face or directional motif, identify it consistently through cutting and assembly. The fabric face-and-back identification guide is relevant to that control. Do not accept a sample that has been temporarily folded or taped to imitate the intended band position unless that method is explicitly part of the supplied design.
- Photograph the band from front, rear and side on the same chair.
- Record any rotation or strain observed during fitting.
Use the chair in the trial
Keep the decorative purpose separate from seating function
With the venue or project owner, carry out an ordinary seated-use trial appropriate to the intended location. Check that the cap remains on the backrest, does not cover the seat and does not obstruct normal chair handling. Observe whether the decorative point reaches into adjacent seating space. These observations help refine the fit; they are not a general safety certification.
For repeated hospitality use, discuss removal, cleaning and refitting before approving the assortment. The dimension and shrinkage planning guide helps separate as-supplied fit from the dimensions needed after agreed care. Confirm any required testing with the responsible specialist. Avoid imagery near open flames or copy implying that the textile has a fire-performance rating unless the exact product and use have supporting evidence.
- Include neighboring chairs in the proposed table arrangement.
- Document removal and refitting without hidden fasteners or styling tricks.
Package the cap for the next fitting
Preserve the point and make size identification clear
Trial the proposed pack and unpack the cap onto the intended chair. Check whether the folded point needs preparation, whether the band creases across its most visible area and whether the opening can be identified easily. If different chair fits are ordered, use clear product references on the pack so the receiving team does not judge the wrong cap against a chair.
Agree the number of physical fit samples and the unresolved questions using sample-scope planning. Release the chair reference, fitted photographs, point profile, band position and packing method together. Share these with FY Bedding for a scoped Halloween textile discussion; proposed quantities, construction feasibility and timing need confirmation rather than an assumed promise that a seasonal design can be supplied immediately.
- Retain one fitted reference for every approved chair group.
- Confirm the unpacking steps needed before display.
Does the packed sample fit the named chair, preserve the intended hat profile and leave the seat and ordinary chair handling unobstructed?