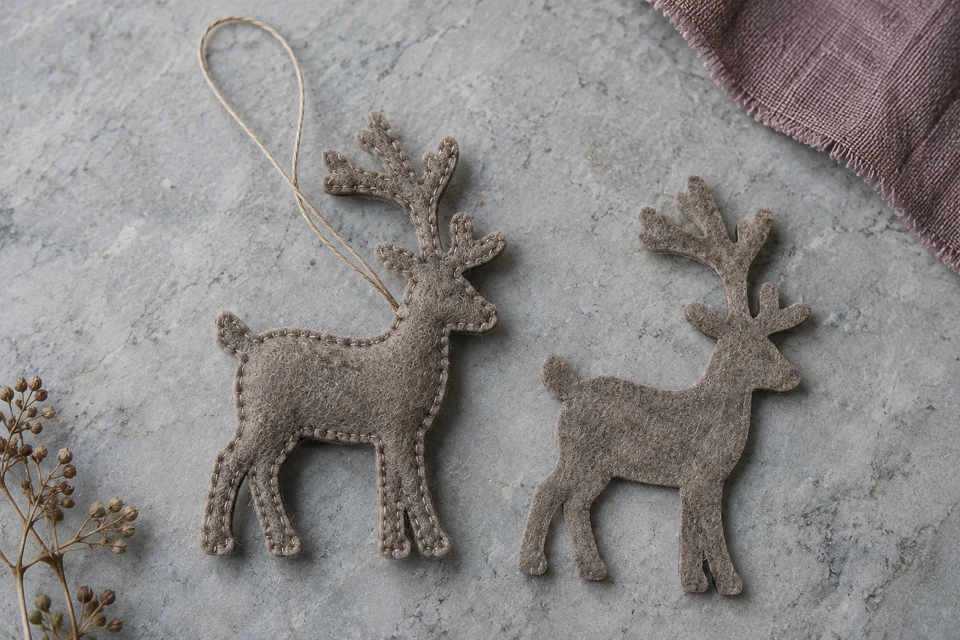
A flat felt reindeer ornament relies on its antlers to make a compact silhouette readable. Narrow branches and the valleys between them can change when two layers are joined, a seam is added or the ornament is packed. A buyer should approve those features in the offered construction rather than sending a drawing that cannot be reproduced at the chosen scale. This is a decorative accessory brief, not an assertion of toy suitability or any untested strength performance.
Name the visible branches on the profile
A recognizable outline needs a reproducible reference
Mark the intended antler branches and tips on the finished silhouette, including any overlap between the front and rear antler. Show which gaps are meant to remain open. The technical pack should distinguish deliberate simplification from a missing branch. Record the finished ornament size and the direction of the profile so a mirrored or scaled version cannot quietly replace the approved design.
Compare the drawing with an actual cut sample in the proposed material. A narrow feature that appears clear on a large screen may become visually ambiguous on a small ornament. Ask the maker to flag construction constraints before final artwork approval. If the design is simplified, retain the revised profile and explain the change rather than letting each production sample develop its own branch arrangement.
- Identify branch tips and the gaps that must remain visible.
- Approve the profile at the actual finished scale.
Match the profile to the offered edge construction
A cut silhouette and a turned seam are different proposals
State whether the ornament uses cut felt edges, joined layers with visible perimeter stitching or another proposed method. Identify the material and thickness through supplier information rather than visual appearance alone. A drawing approved for a flat cut edge may need revision if the maker proposes a turned construction. Keep that decision explicit so the quotation and sample refer to the same product.
Inspect the inward valleys between branches as carefully as the outer tips. Joined layers may shift locally or accumulate visible stitching in a narrow region. Use the seam specification method to document the offered join where relevant. Do not invent a minimum branch width or universal stitch setting; request a physical trial and an agreed acceptance example for this material and scale.
- Identify the actual cut-edge or joined-layer method.
- Examine inner valleys as well as outward tips.
Check registration between the layers
A clean front may hide a shifted reverse
Review the ornament from both sides and along the edge. If it uses paired layers, compare how their antler branches and other narrow features align. Define whether a visible offset is an intended design detail or an assembly issue. Keep the front and reverse in the design version record so the maker does not rely on a single flattering face photograph.
If the proposal includes filling or an internal layer, identify how that changes the branch profile and the rest of the body. A fuller torso does not necessarily justify changing the flat antlers. Ask which component changes require a new sample and record them before release. Any requested handling evaluation belongs in a product evidence plan; layer alignment alone is not evidence of attachment strength or durability.
- Inspect front, reverse and the layered edge.
- Keep intentional offsets distinct from uncontrolled registration changes.
Locate the hanging loop in the complete profile
The loop affects the natural displayed angle
Mark the loop attachment position and specify the proposed loop material and connection. Suspend the finished ornament freely to review its natural angle. A loop installed at a convenient seam may cause the nose or antlers to tilt differently from the design image. Approve the resting view rather than holding the silhouette level during photography, and retain a sample with the final loop installed.
Do not use a narrow branch as an assumed load-bearing attachment point without a specific design and evidence review. Ask the maker to explain the proposed connection and any requested evaluation. Keep the retail description within the decorative use that has actually been agreed. The buyer resource checklist can help separate the component declaration, visual approval and any market-specific evidence still outstanding.
- Review the freely hanging angle with the final loop.
- Treat the loop connection as a defined component, not an incidental trim.
Check the antlers after unpacking
The selling pack must preserve a readable silhouette
Agree how ornaments are separated or nested so antler branches do not become trapped under neighboring pieces. Open a packed sample and compare the visible branch count, gaps and tips with the accepted profile before reshaping. If a simple arrangement step is expected, document it and confirm that it is reasonable for the intended retail presentation. Do not hide substantial correction work behind an attractive pre-packed photograph.
Count complete ornaments and verify the color or profile assortment with the assortment verification method. Align material, layer count, edge finish, loop and packing when comparing quotations. Ask which design changes affect MOQ or sample work and request the actual production schedule. Keep any Christmas arrival expectation tied to confirmed order and delivery planning, not to the date of the design approval alone.
- Compare the received branch profile before restyling.
- Quote the same complete ornament and protective packing arrangement.
Send FY Bedding the full-size reindeer outline and intended ornament scale. Request cut and assembled profile samples plus the selling pack so antler branches, layer alignment and hanging position can be approved on the real construction.