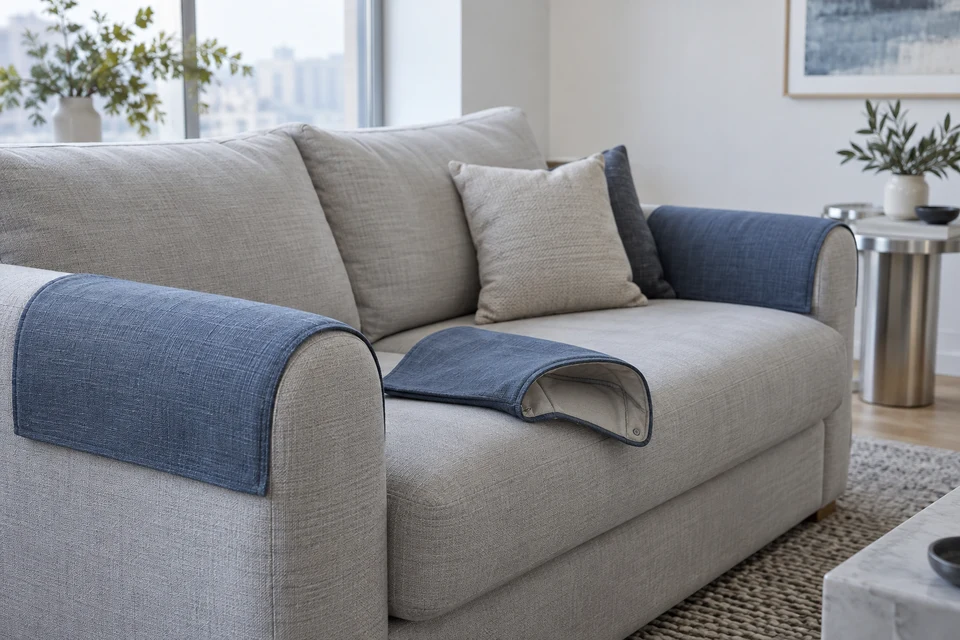
A sofa arm cap is a small shaped cover, not a universal rectangle. Two sofas with the same overall width can have very different arm crowns, front rolls and upholstery surfaces. Buyers therefore need a fit reference that describes the furniture interface, not only the dimensions of the loose textile. This guide concerns removable decorative arm covers; it does not establish stain resistance, waterproofing or suitability for every upholstery. The purchasing decision is whether a defined cover remains presentable and removable on the furniture profiles actually offered to customers.
Map the arm in three directions
Separate crown width from the outside drop
Measure the front profile, usable top length and inner and outer drops on the intended sofa. A rounded crown needs a different pattern from a flat square arm, even where a tape measurement across the top is similar. Identify the point where the front cap ends and where the rear edge stops near the back cushion. Show these landmarks in the technical brief, using photographs alongside the drawing rather than asking the maker to infer curvature from one dimension.
Check both arms independently before assuming they are mirrored copies. A storage pocket, control or asymmetrical cushion can change the useful coverage. State whether the program includes a left and right pair or interchangeable pieces. Where several sofa models are proposed, retain a model-to-template list. Do not quietly stretch one approved pattern across the whole assortment; the commercial benefit of fewer patterns must be compared with the actual fit compromises.
- Identify front, inside and outside landmarks.
- List each furniture profile in the proposed range.
Review retention without inventing a fixing method
The upholstery contact matters
Fit a production-intent sample on the intended upholstery with no hidden pins, tape or styling supports. Observe the cap before and after an agreed sequence of ordinary arm contact and cushion movement. Record whether the front panel twists, the rear edge lifts or the cover travels toward the seat. Define the practical review with the furniture owner; this is a fit observation, not a laboratory durability or safety claim.
If a backing or retention feature is proposed, identify it separately in the component record. Ask the furniture owner to approve contact with the actual upholstery and cleaning route. Avoid adding adhesive, rough fasteners or permanent attachments merely to make a demonstration pass. A cap that works only with an undisclosed fixing does not match a removable-cover brief. Compare alternatives using the same furniture, contact sequence and sample condition.
- Show the cap without temporary styling aids.
- Approve any backing against the furniture surface.
Make seams part of the visible shape
Inspect the front curve and its reverse
Turn the cap inside out and compare its seam route with the approved front outline. A bulky allowance can create a ridge around a rounded arm; an attractive loose cap may become uneven when stretched over the furniture. Review the fitted front view at normal room distance and the seam at close range. Use the seam brief to record construction, rather than accepting a general statement that the edge is neatly finished.
For textured or directional material, mark the intended face and orientation on the pattern. Keep paired caps visually consistent when viewed from the room entrance. Ask for declared fiber composition and finishing details rather than inferring material from a photograph. A construction change that improves turning can also change coverage, so return to the original landmarks after revisions instead of approving seam appearance in isolation.
- Inspect the fitted curve and inside seam together.
- Keep left and right texture directions intentional.
Approve removal and care as a fit cycle
A clean loose cover is not the final check
Ask the responsible technical owner to define the care trial appropriate to the proposed material and intended instructions. Measure the same landmarks before and after that agreed process, then refit the cap on the original sofa. The dimensional stability guide helps separate the measurement method from an unsupported universal tolerance. Record curling, seam distortion and changes in retention as observations tied to this particular sample.
Check that the ordinary removal route does not require excessive force or furniture disassembly. If the cap has a separate lining, look for movement between layers when taking it off and putting it back. Record any finishing used before the final photograph. A freshly pressed presentation should not be mistaken for the condition immediately after the specified care sequence.
- Refit after the agreed care process.
- Disclose pressing or reshaping before approval photos.
Quote a controlled pair and size range
Keep packaging and replacement assumptions visible
Request quotations against the template list, declared materials, pair composition and approved pack fold. Ask whether minimum quantities apply by fabric, color or pattern, and whether a replacement single cap is a separate orderable item. The component MOQ discussion can reveal shared inputs without pretending that all furniture fits become one finished SKU.
Pack the pair so the front curves are not permanently presented as crushed folds. State furniture-not-included and show only the coverage that the sampled cap provides. Share the sofa profiles, intended material, color count and target order mix with FY Bedding to discuss a scoped sample request. Release the item only when the quotation, packaging description and fitted reference all identify the same pair and approved furniture models.
- Separate material minima from pattern-level quantities.
- List compatible sampled profiles without universal-fit claims.
Approve the fitted arm cap against named sofa profiles, with visible retention, a repeatable removal route and a post-care refit. A matching color alone is not a fit approval.