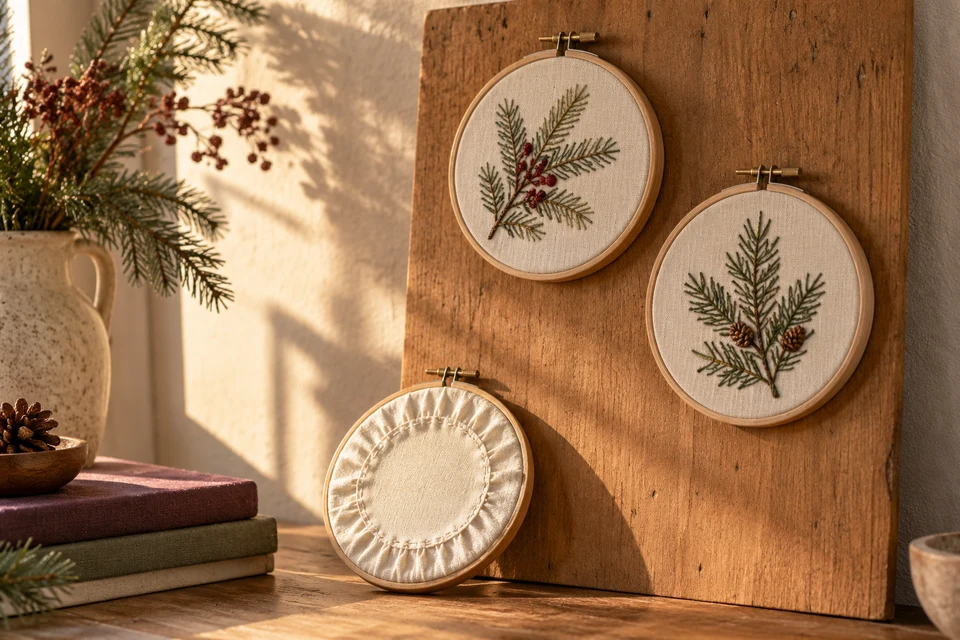
A small embroidery hoop turns a flat Christmas stitch design into a finished decorative object. The sale is not complete when the embroidery looks attractive: the ring, fabric tension, visible crop and reverse finish all influence the item a retailer receives. Approve the assembled ornament rather than treating the hoop as disposable sample equipment.
Specify the hoop as part of the product
Separate a finished decoration from a craft kit
State whether the order is for a completed ornament, embroidered fabric only or a kit containing separate parts. For a finished item, identify inner and outer rings, tightening hardware, fabric, embroidery, backing and any hanging loop. Confirm which ring dimension is quoted: outside diameter and the visible textile opening are not the same measurement. Record the finished profile from the side as well as the face used in the online listing.
If buyers want recipients to remove or replace the fabric, that changes the assembly and instructions. Do not describe a permanently backed ornament as a reusable craft hoop without reviewing how it opens. Record the supplied components in the bill of materials. Ask the responsible product reviewer to assess the intended use, hardware and evidence requirements; decorative styling does not establish suitability as a toy or child craft kit.
- Name the supplied unit and the visible opening measurement.
- Confirm whether the fabric is intended to be removable.
Approve the motif inside the real opening
Allow for the ring before centring the artwork
A fir branch that appears centred in an embroidery file may feel crowded once its tips approach the ring. Place the production-intent textile in the actual hoop and review the visible margin all around. State the relationship between the motif and the tightening screw or hanging point. Where a set uses several designs, decide whether the visual centres should align or whether intentional asymmetry is part of the collection.
Use the embroidery approval process to retain stitch direction, thread colours and backing information, but add a photographed hoop crop for every design. A larger hoop should not automatically inherit the same artwork scale. Review the smallest design details at the intended selling size, and keep the stitch sample distinct from the final object approval so a later ring substitution cannot silently crop the motif.
- Show all motif extremities within the approved margin.
- Attach each artwork revision to a specific hoop size.
Review tension without prescribing an arbitrary setting
Inspect the complete textile and ring relationship
Agree what an acceptable face looks like: sufficiently even for the design, without folds, obvious skew or distortion of the stitched motif. Inspect the fabric grain and the ring contact around the circumference. Tightening until the surface merely looks taut in one photograph can conceal an uneven crop or a distorted circle. Ask the maker to document its assembly method and show repeat samples rather than inventing a universal screw setting.
Retain an approved reference and, where useful, a clearly unacceptable example with the problem identified. Review whether normal packing and handling change the face or allow the textile to shift. The defect classification framework can separate appearance issues from other concerns, but any strength or retention claim needs its own appropriate evidence. Do not call a visual tension review a measured durability result.
- Inspect grain direction and motif distortion together.
- Compare repeat assembled samples, not only one adjusted prototype.
Contain the reverse deliberately
Make folds, threads and backing inspectable
Specify whether the surplus fabric is gathered, folded, trimmed or otherwise contained and whether a separate backing circle is supplied. Look for loose threads, exposed embroidery backing and bulky folds that prevent the object sitting as intended. The reverse need not resemble the embroidered face, but it should match the sales description and the agreed finish. Photograph it before adding packaging that hides the construction.
Where adhesive, sewing or a mechanical fixing is used, identify the actual method and review the relevant materials and handling conditions. The embroidery reverse-side checklist provides useful observations, while this hoop also needs a perimeter-containment check. Keep the hanging attachment separate from decorative folds. Any change to that connection or the ring material should reopen the affected assembly and evidence review.
- Record how surplus fabric and thread ends are contained.
- Inspect the perimeter behind the ring, not just the centre backing.
Pack without loading the screw against the next face
Approve sets in their actual orientation
Lay out the intended retail set and check whether tightening hardware contacts another ornament's fabric. Use the actual wrapping, separators and carton arrangement for the sample review. Open the set and inspect ring condition, motif position, surface marks and any shift in tension. Do not accept a loose studio photograph as proof that the packed assortment will arrive in the same presentation. Record the observed unpacking condition and any corrective proposal.
Ask quotations to show the minimums for rings, embroidered designs and packed assortments separately using the MOQ comparison guide. Confirm sample and packaging milestones before committing to a seasonal launch. Send FY Bedding the hoop sizes, motif files, reverse preference and pack layout for a development discussion; the proposed design does not imply a confirmed manufacturing method, stock quantity or dispatch date.
- Keep metal or projecting hardware away from adjacent embroidered faces.
- Freeze the final crop and reverse finish before photography.
Approve one complete object: ring, visible crop, relaxed face, contained reverse and pack. An embroidered swatch alone cannot close that decision.