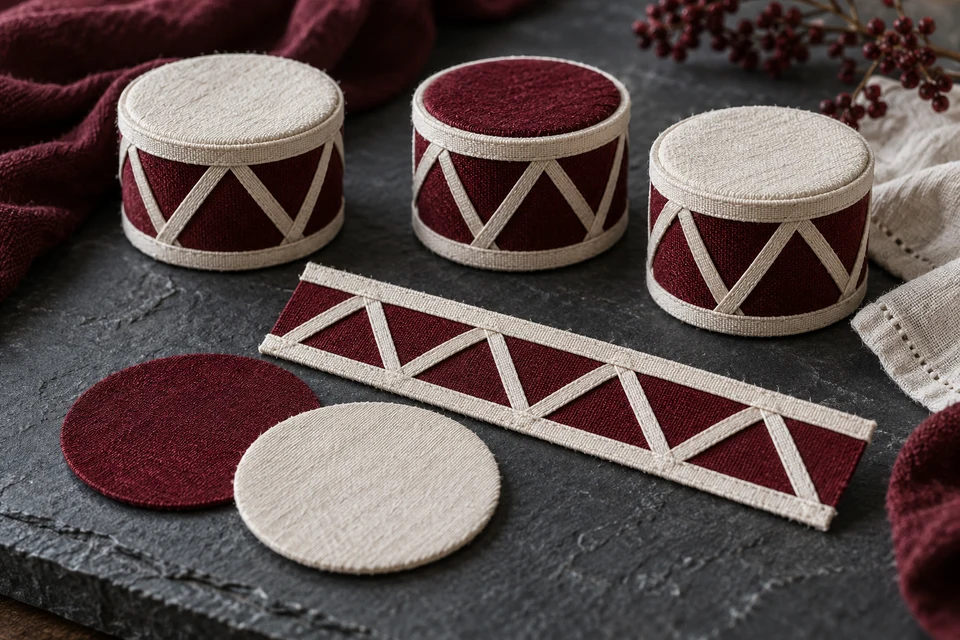
A small drum-shaped Christmas ornament can suggest an instrument through circular ends and a decorated side band without functioning as one. The purchasing decision is therefore about a decorative textile assembly, not sound quality. Buyers need to approve how the end discs meet the band, where the side closes and how ribbon motifs continue around the circumference. A complete sample should make these relationships observable instead of hiding the closure at the back of every photograph.
Inventory the cylinder before decoration
Two ends and a side band need shared references
Identify the upper disc, lower disc and side band on an exploded drawing. State whether the ends are equivalent or intentionally different. Record the proposed finished diameter and height, together with a measurement condition that does not compress the soft assembly. Ask the maker to declare any support or filling inside. A firm-looking cylinder in an image does not establish that the product is entirely soft or that an internal component is included.
Use the technical pack to connect the three pieces and any internal support. Request an undecorated development sample if it helps isolate the shape decision. Compare the upper and lower outlines without forcing them into a circle by hand. A side band that is altered to correct height may also change its relationship to the discs, so review the full cylinder after that revision.
- Name both end discs and every internal component.
- Measure the assembled cylinder without compressing it.
Locate the side-band closure deliberately
The closing join should belong to the pattern plan
Mark where the flat band closes around the cylinder and decide whether that join is the designated rear. Show how any crossed ribbon or contrasting trim approaches the join. An attractive repeat on a flat strip can leave an unusually wide gap or doubled decoration when the ends meet. Ask for a full-circumference view rather than relying on a single front angle that excludes the closure.
Record the seam construction with the seam and stitch reference. Keep the band length, closing allowance and decoration placement linked during development. If the supplier changes the closure route, request another complete view to verify the visual sequence. Do not solve a mismatch by rotating a top disc or adding an unapproved ribbon piece without updating the assembly drawing.
- Show the closing join within the decoration map.
- Review the entire circumference after a closure change.
Register the end discs against the side decoration
The top and bottom borders frame the rhythm
Inspect the upper and lower junctions where the side band meets each disc. Decide whether a border covers the seam and how the ribbon ends meet that border. Compare the visible spacing around the circumference rather than checking one convenient section. If the end discs have their own decoration, identify its orientation relative to the side closure and any hanging connection. Otherwise the parts can each look acceptable while the assembly feels misaligned.
Preserve a top, side and lower-edge view in the visual approval record. Show ordinary fabric texture and any accepted soft rounding. Do not retouch the cylinder into a mechanically perfect shape that the textile sample does not maintain. The editorial image illustrates the construction discussion; it is not proof of a particular support material, manufacturing method or finished-product performance.
- Check ribbon-to-border relationships around both ends.
- Retain the ordinary soft shape in approval photographs.
Choose standing or hanging display scope
A loop changes the top-end decision
State whether the ornament rests on a surface, hangs from a supplied loop or supports both presentations. If a loop is included, identify the connection and how it relates to the upper disc. Ask for the actual assembly detail rather than assuming the decorative ribbon carries the connection. Review the ordinary hanging orientation separately from the table-top view, because the side closure may become visible in a different position.
Track these decisions with the buyer resources. Keep the offer decorative and avoid implying a playable instrument, toy or sound-producing feature without a separate brief and relevant evidence. Any rigid support, removable part or accessory must be declared. A new display mode should not be added to a product listing solely because the same shape appears suitable in a lifestyle image.
- Declare standing, hanging or dual display explicitly.
- Separate decorative resemblance from instrument or toy claims.
Pack complete drums without losing end identity
Nested components and finished ornaments are different supplies
Confirm whether the order contains assembled ornaments or pieces for later assembly. For a finished product, trial the actual pack and observe whether the discs flatten, the side band folds or the border shifts. Open the pack and inspect the closure and both end junctions before rearranging the display. Record any simple setup action, and keep it distinct from a workshop repair that a retail buyer should not be expected to perform.
Use the pack comparison process to retain the sequence. Quote the specified support, decoration and display connection together. Ask about minimums for each color combination and whether a size change requires new disc and band development. Confirm feasible dispatch planning after those approvals; a familiar drum silhouette does not establish that another size or packing method is ready for bulk supply.
- Distinguish finished ornaments from assembly-component kits.
- Inspect both end junctions and the closure after unpacking.
Give FY Bedding an exploded disc-and-band drawing, closure location and display scope. Request a full-circumference sample and actual-pack comparison. Approve ribbon registration at both ends before releasing the decorative drum set.