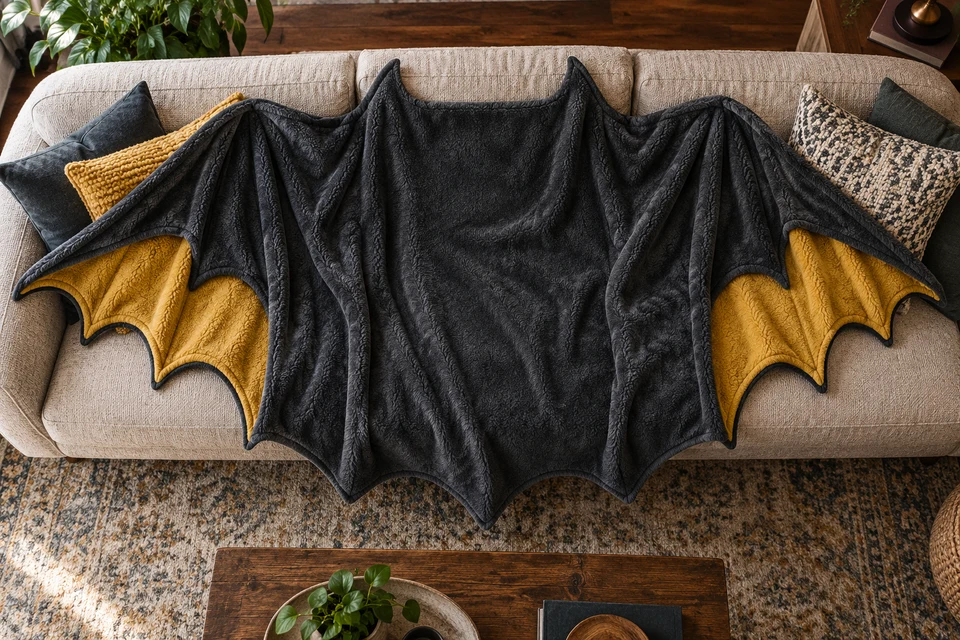
A bat-wing outline can make a seasonal throw recognizable before any print is added. It also creates a sizing problem: the maximum span includes projecting wings and does not describe the central area available for ordinary coverage. Buyers should communicate both. This brief concerns an adult decorative throw, not a wearable costume, sleep accessory for children or a product with an assumed thermal rating. The shape, material, intended use and supplied size need their own approval records.
Measure the continuous central area first
Projecting tips should not inflate the useful size description
Draw the full outline and identify a central coverage area using clear landmarks. Record its length and width separately from the maximum wing span and lowest projecting point. State how the throw lies during measurement and avoid stretching the fleece to reach a preferred number. Where a curved edge prevents a simple rectangle, use an agreed drawing to show the area rather than presenting one ambiguous dimension as the whole story.
Include the two kinds of measurement in the product specification pack. Ask suppliers to quote against the same outline and measurement condition. A throw with long narrow wings may have the same headline span as one with a substantially larger center. That is a meaningful product difference, not a minor tolerance issue, and should remain understandable in the retail description.
- Separate central coverage from maximum outline dimensions.
- Keep the same relaxed measurement condition for all samples.
Define each wing point and scallop
The spaces between tips shape the silhouette
Number the wing tips and the concave scallops between them on the drawing. Confirm whether the left and right wings are mirrored and whether the upper edge contains any additional pointed feature. Review a full cut-outline reference before the edge is finished. An apparently small change to a deep scallop can remove central coverage or make one wing look noticeably shorter when the throw is draped.
Connect the outline to the edge construction reference. Ask the maker to demonstrate the proposed finish around both outer points and inner curves using the actual fleece. Do not prescribe one binding or stitch treatment for every material. Compare the finished outline with the original drawing and record accepted rounding at the tips instead of expecting a sharp paper-cut shape from a soft textile.
- Map both projecting tips and inward curves.
- Approve the finished outline, not just the cut template.
Review both surfaces at the wing edges
A contrasting reverse changes the visible outline
If the throw has two surfaces or a contrasting reverse, identify the proposed construction and which side is intended as the front. Turn back one wing and examine the edge junction. Decide whether the reverse color may show naturally around the outline. A narrow contrast glimpse can be attractive, but uncontrolled rolling or a changed edge width should not be accepted solely because it looks dramatic in one photograph.
Keep face, reverse and turned-edge views in the retail photography record. Confirm material descriptions from the actual proposal rather than inferring composition from a plush appearance. Do not claim a tested warmth or reversible performance from the image. If both sides are part of the offer, define the corresponding appearance and care review for the complete construction.
- State whether reverse contrast is an intended visible feature.
- Review edge behavior with the actual proposed paired surfaces.
Demonstrate the size on a representative setting
A sofa view should explain the product, not exaggerate it
Spread the sample on a representative adult-sized sofa or other agreed display surface and record that surface's dimensions. Show the center and both wing tips without hiding one side behind cushions. Decide whether the ordinary use involves a loose drape or a fully spread display. Keep those views separate because the wing outline may be less visible in a natural fold while the central coverage remains unchanged.
Use the buyer resources to record intended-use questions and any required evidence. Do not describe the throw as a fitted sofa cover merely because it is photographed on a sofa. Avoid a cropped retail image that implies more continuous fabric than the outline contains. Each offered size needs a clear coverage drawing even if only one lifestyle setting is used for the wider collection.
- Record the display furniture dimensions with the sample view.
- Do not confuse a loose decorative throw with a fitted furniture cover.
Choose a fold that preserves the product identity
A compact rectangle can conceal the shaped design
Trial the retail fold with the full wing outline and decide how the pack communicates the unusual shape. A folded rectangle alone may look like a conventional throw, so the product information should include the complete silhouette and central dimensions. Check where the narrow tips sit inside the pack and observe the sample immediately after opening. Record any simple smoothing action separately from the initial condition.
Retain the trial with the packaging review. Discuss material yield, minimums and sample requirements for the actual cut outline rather than pricing only a maximum rectangular area. Confirm dispatch feasibility after the shape and construction are approved. A change intended to improve cutting efficiency may alter a scallop or the central area, so it must return to the coverage drawing for review.
- Show the full outline in product information for a compact pack.
- Recheck central coverage after any cutting-efficiency revision.
Provide FY Bedding with a full outline, central coverage dimensions and the intended face-and-reverse construction. Request finished-edge and representative-sofa samples. Approve the useful center, wing silhouette and pack description as separate but connected decisions.