A pieced pumpkin quilt creates the seasonal motif through joined fabric shapes rather than a single printed panel. The wedge arrangement, stem and surrounding background determine whether each block reads as the intended pumpkin. Quilting then adds another set of lines. Approving only the completed bed view can conceal the source of a misplaced join. Buyers should review the block assembly before reviewing the quilted surface, and keep the two decisions connected without confusing them.
Number the wedge pieces within the block
Similar colors do not make pieces interchangeable
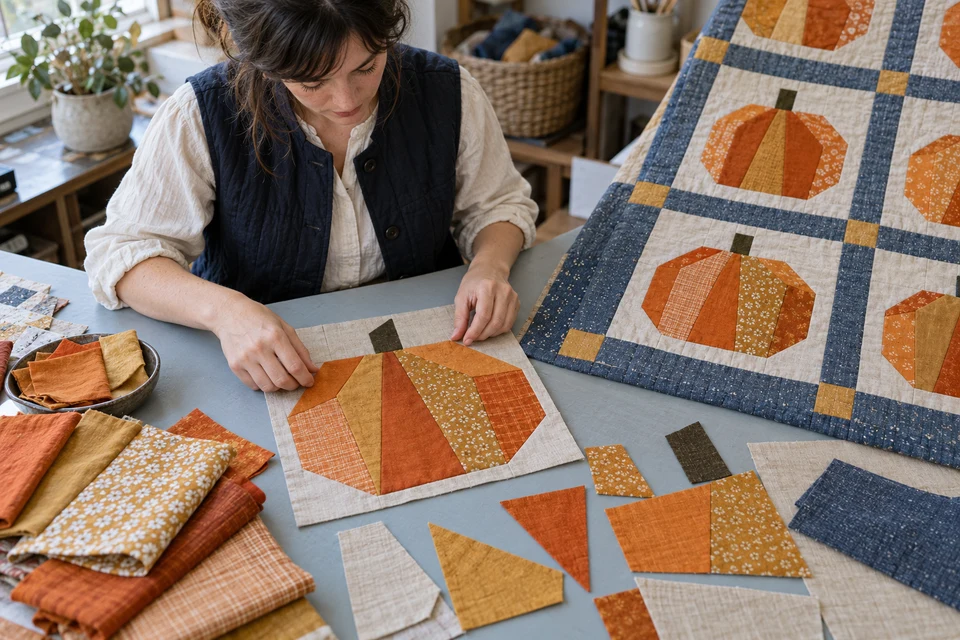
Prepare a block drawing with each wedge, background corner and stem identified. Mark grain or print direction where it is important to the design. State whether the pumpkin is deliberately asymmetric or intended to have a balanced left-right shape. Two orange pieces may look similar in a fabric bundle but occupy different positions because of their width, pattern or relationship to the stem. The assembly reference should remove that ambiguity.
Use the technical pack to connect the numbered pieces with material references. Request a loose-piece arrangement and an assembled, unquilted block. Comparing them shows how seam allowances and joining affect the visible shapes. Do not accept a printed imitation as the construction reference for a pieced product; it may explain the artwork but cannot demonstrate the actual wedge junctions.
- Identify wedges, background pieces and stem separately.
- Keep loose-piece and sewn-block references together.
Inspect where narrow wedges converge
The top and bottom joins are not just decorative details
Look at the pumpkin's upper and lower convergence areas before quilting is added. Note whether a narrow wedge remains visible or disappears into the join, and whether the neighboring pieces create the intended outer curve. Ask the maker to describe the proposed seam arrangement and any accepted simplification. A tidy-looking center should not be achieved by changing the pumpkin proportions without a revised drawing.
Record the accepted assembly using the seam and stitch guide. Compare the block laid naturally rather than stretched into a square for the photograph. If a join is revised, recheck the stem and the outside background corners because the correction can shift those relationships. Keep observations about visible alignment separate from any strength or durability claim that would require an agreed assessment.
- Check narrow wedges before the quilting layer is added.
- Reinspect the whole block after a convergence correction.
Use the stem to confirm block orientation
A small component can expose a rotated assembly
Specify where the stem meets the pumpkin and whether it is centered, angled or offset by design. Identify any stem direction that repeats across the quilt. A block can look plausible on its own yet be rotated or mirrored incorrectly in the larger arrangement. Lay out several unquilted blocks together and compare the stems, background corners and dominant fabric patches before joining the rows.
Keep a complete layout image in the visual approval record. If fabrics are intentionally assorted, define which elements may vary and which placement rules remain fixed. A phrase such as mixed orange prints is not enough to explain whether adjacent blocks may be identical or whether one dark wedge must always occupy the same position. The retail images should represent the approved degree of variation.
- Mark stem direction in both block and quilt layouts.
- Define permitted fabric variation without losing the orientation rule.
Review quilting as a separate overlay
Stitch lines should not disguise an unresolved piecing error
Show the proposed quilting path over the accepted block drawing and identify whether it follows wedges, crosses them or forms an independent pattern. Review a quilted sample alongside the unquilted block. Observe how the added stitching changes the apparent pumpkin shape and surface relief. Do not use a dense quilting line to hide a wedge join that was never accepted in the piecing stage.
Discuss the construction and evidence scope through the buyer resources. Confirm the proposed layers, filling where included and care requirements from actual supplier information. A thick-looking photograph does not establish warmth, composition or a tested performance level. If the quilting or layer combination changes after approval, repeat the visual comparison at the narrow joins and stem rather than checking only the overall quilt dimensions.
- Retain separate piecing and quilting approvals.
- Recheck motif shape after changing stitch path or layer construction.
Release each quilt size with its block layout
Adding a row changes the design as well as the dimensions
For every size, show the number of blocks, row arrangement, border treatment and any partial motifs at the edge. Decide whether larger sizes add blocks or enlarge them. These choices affect both appearance and development work. Request a finished view that shows the full layout, then trial the intended fold so the retail presentation does not accidentally suggest a different block count or color assortment.
Use the packaging comparison method to record the folded and reopened sample. Ask for quantity and cost assumptions based on the actual block and fabric assortment. Confirm sample approvals and dispatch feasibility before a seasonal commitment. When substituting a fabric, revisit its visual position within the block rather than accepting it solely because its general color falls within the orange palette.
- Document block count and border rules for every size.
- Review replacement fabrics in their assigned wedge positions.
Provide FY Bedding a numbered pumpkin block, material map and full quilt layout. Request loose pieces, an unquilted block and a quilted comparison. Approve wedge convergence and stem orientation before authorizing the finished size range and retail fold.