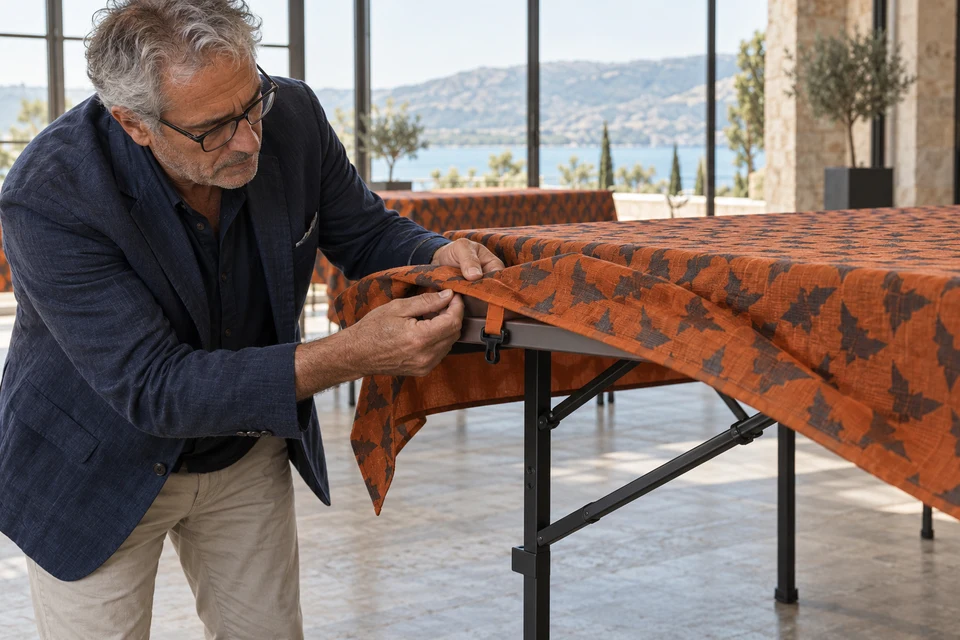
A seasonal event tablecloth may include sewn tabs intended to connect with specified clips or another approved attachment arrangement. The tab locations are a textile development decision, distinct from choosing a generic table-edge clip. A table's legs, braces and folded hardware can make an apparently symmetrical tab map impractical. Buyers should provide the actual furniture reference and approve the cloth's placement before adding tabs, so the attachments do not become a way to disguise an incorrectly sized tablecloth.
Identify the folding-table variant precisely
Equal tabletop dimensions do not imply equal undersides
Record the table's top dimensions and provide clear views of its edge, leg positions, braces and accessible underside areas. Use the actual furniture intended for the event rather than a generic rectangular table drawing. Ask the responsible venue or furniture owner to confirm the permitted attachment method. Do not drill, bend or otherwise modify the table to make a sample tab arrangement work unless a separate authorized process requires it.
The tablecloth clip fit guide addresses the accessory-to-furniture interface. Keep that decision separate from the sewn tab map developed here. If several table models share a cloth size, identify each model and test the intended tab locations on each. A common tabletop length does not establish that one attachment layout will clear every brace or leg assembly.
- Record the actual underside, not only the tabletop size.
- Keep furniture permission and accessory selection separate from textile placement.
Freeze the cloth's resting position before mapping tabs
Attachments should preserve the approved drop
Place the correctly sized cloth on the table using the agreed centering method. Record side and end drops and identify the front direction of any engineered motif. Mark proposed tab positions relative to finished cloth landmarks, not only relative to a temporary mark on the table. If the cloth is shifted to reach a convenient clip point, the printed scene or drop may no longer match the accepted presentation.
Put the cloth-and-table drawing in the technical specification pack. Distinguish required tab locations from areas where the maker may propose alternatives. Review each alternative on the complete table arrangement. A location that appears tidy from underneath can still pull the edge into a visible fold, so the buyer needs both the attachment view and the ordinary guest-facing view.
- Map tabs from finished cloth landmarks after centering.
- Reject attachment placement that silently changes the approved drop.
Specify the tab itself and its connection to the cloth
A small sewn piece needs a clear material and orientation record
Define the proposed tab material, finished form, opening or connection point and attachment area. Show which side of the tab faces outward and how it sits when not connected. Ask the maker for an exposed construction sample before the junction is hidden in a hem or another layer. Record the intended interface with the selected accessory without assigning an unsupported universal holding force.
Use the seam specification to preserve the textile connection. Check the front of the cloth after the tab is assembled and after it is connected by the approved method. If a reinforcement or tab length changes, reassess both the underside clearance and visible edge. A locally stronger-looking construction is not automatically a better fit for the approved furniture and presentation.
- Identify tab material, orientation and connection area.
- Review visible cloth effects after any tab or reinforcement change.
Walk through the ordinary event setup
Access matters as much as the final position
Have authorized personnel demonstrate the intended placement and removal sequence on an empty, stable table. Check whether each tab can be reached without interfering with a leg brace or requiring an unsafe posture. Record which connection is made first and whether another becomes inaccessible afterward. Do not treat a single attractive final photograph as evidence that the arrangement is practical during routine event setup.
Retain front and underside photographs in the visual approval record. Describe any extra handling step without inventing labor savings or a timed performance result. If a tab layout is meant only for one venue table, state that limitation. Outdoor wind resistance or another use beyond the observed indoor arrangement requires its own brief and appropriate evidence, not a broader interpretation of this sample trial.
- Review access in the actual connection sequence.
- Keep observed indoor fit distinct from outdoor or load claims.
Make tabs understandable after care and packing
A hidden tab should not become an unidentified loose component
Confirm whether accessories are removed before the proposed care process and whether tabs remain integral to the cloth. Identify any special handling or evidence questions for the complete construction. Fold the tablecloth using the proposed storage or transport method and open it for a new setup. Check that the front direction and tab identities remain clear without relying on the person who originally arranged the sample.
Use the packing review framework to keep the setup comparison. Quote tab count, construction and compatible furniture scope explicitly. Request minimums and feasible sample timing for that identified combination. When a new folding-table model is introduced, revisit its underside map before ordering replacement cloths; reusing the same product name or top dimensions is not enough to carry over the attachment approval.
- Identify removable accessories and integral tabs separately.
- Recheck the map when the furniture model changes.
Send FY Bedding the actual folding-table reference, permitted attachment method and approved cloth drop. Request a sewn tab sample and a complete setup trial. Release the textile tab map only after access, underside clearance and the guest-facing presentation are accepted together.